High-Performance Computing Project
Linux HPC Cluster: Slurm, Ansible Automation, and MPI Operations
In this project, I built a small Linux cluster to practice system design, deployment, automation, validation, recovery, and general operations in a small-scale HPC environment. I built a controller node (head/login) that manages cluster services and a worker compute node that executes scheduled workloads. My goal was to practice systems engineering workflows used in HPC: deterministic networking, repeatable configuration, scheduler-driven execution, authentication, validation, troubleshooting, and recovery.
Concepts
- Linux cluster administration and deterministic networking
- Automation/configuration management with Ansible
- Batch scheduling with Slurm (controller/worker architecture)
- Authentication and distributed trust using MUNGE
- Validation of cluster health using MPI workloads
- Troubleshooting reliability issues (time sync drift and auth failures)
- Failure injection & recovery (simulated node outage)
Design
I created two nodes: the head node orchestrates, and the compute node executes. The idea is that compute nodes should be as consistent and reproducible as possible, and changes should be applied via automation rather than manual edits.
- Head node (head) (1 CPU, 2 GB RAM, Rocky Linux 9)
- Slurm controller (slurmctld)
- Ansible control node
- Login and orchestration point
- Compute node (cone) (1 CPU, 2 GB RAM, Rocky Linux 9)
- Slurm working daemon (slurmd)
- Execute scheduled jobs

Networking Configuration
Clusters rely on internal networking where nodes can reach each other reliably, and hostnames resolve consistently. I set up a private host-only cluster network for node-to-node traffic and a NAT interface for package installs.
Each VM uses two adapters:
- Adapter 1: Host-Only (cluster network)
- Adapter 2: NAT (internet access)
IP Assignment (Host-Only)
Head node:
sudo nmcli con mod hostonly \
  ipv4.method manual \
  ipv4.addresses 192.168.56.10/24

sudo nmcli con up hostonly
Compute node:
sudo nmcli con mod hostonly \
  ipv4.method manual \
  ipv4.addresses 192.168.56.11/24

sudo nmcli con up hostonly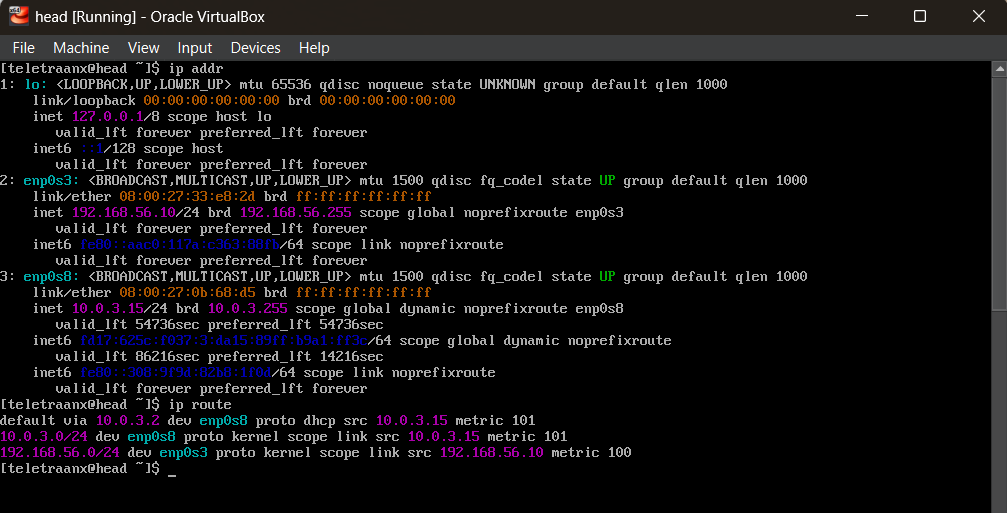
Host Identity and Name Resolution
I set hostnames and /etc/hosts so that both nodes can resolve each other consistently.
sudo hostnamectl set-hostname head # on head node
sudo hostnamectl set-hostname cone # on compute node (c-one)
Edited /etc/hosts on both nodes:
192.168.56.10 head
192.168.56.11 cone
Validation
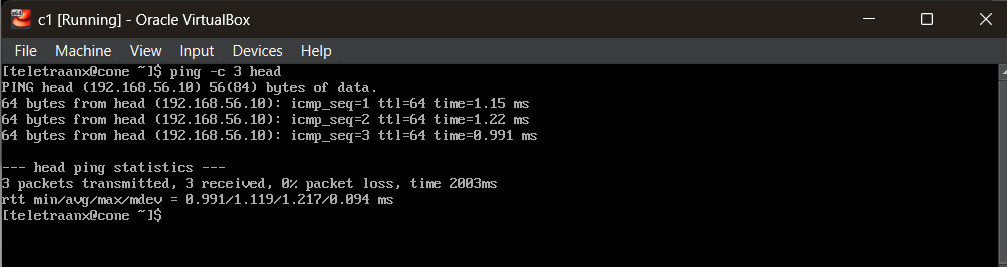
ping -c 3 cone # from head node
ping -c 3 head # from compute node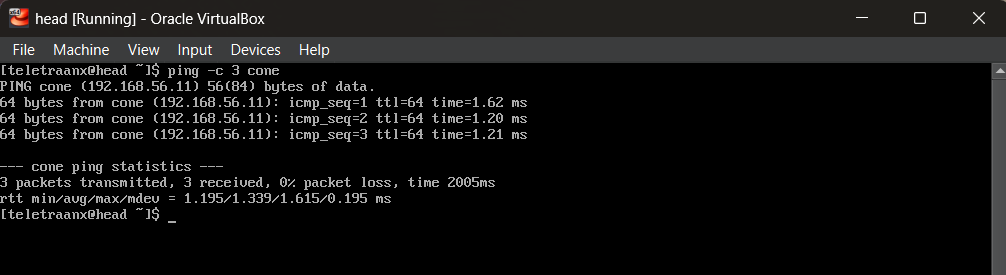
Cluster Hygiene and Chrony
I installed baseline updates, essential utilities, and time synchronization. Distributed systems depend on time synchronization. For example, clock drift will break MUNGE authentication.
sudo dnf -y update
sudo dnf -y install vim git curl wget chrony
sudo systemctl enable --now chronyd
chronyc trackingPasswordless SSH
Ansible will require a control point that can reach nodes. I configured passwordless SSH from the head node to the compute node so that automation can run unattended and repeatedly for my controller/worker management.
sh-keygen -t ed25519 # generate key on head
ssh-copy-id youruser@cone # copy to compute node
ssh cone # tests
Locking SSH config:
Host cone
  HostName cone
  User youruser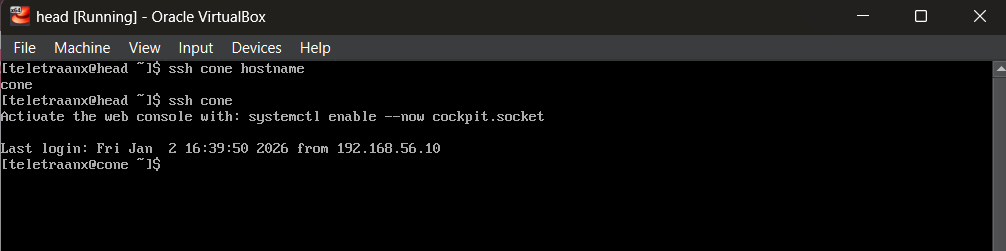
Ansible Automation Framework
Ansible will turn node configuration into versionable, repeatable infrastructure code. The head node acts as the controller, applying changes to the compute node(s) consistently.
Inventory Design
[controllers]
head ansible_host=192.168.56.10 ansible_connection=local

[compute]
cone ansible_host=192.168.56.11

[all:vars]
ansible_user=youruser
ansible_become=true
Enabling passwordless sudo:
sudo visudo
youruser ALL=(ALL)NOPASSWD:ALL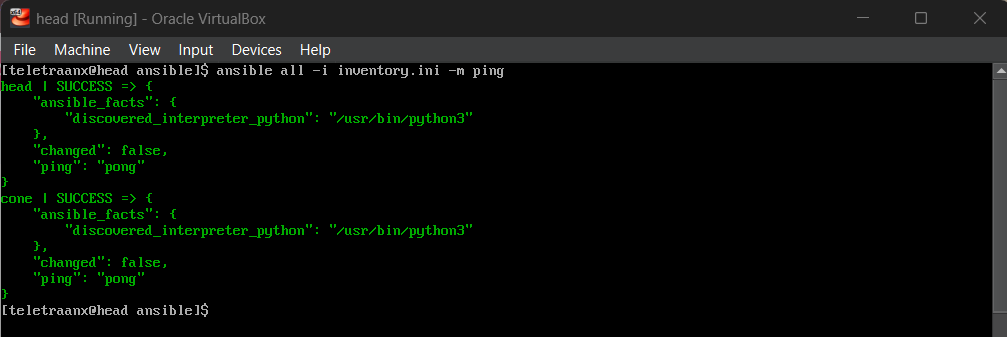
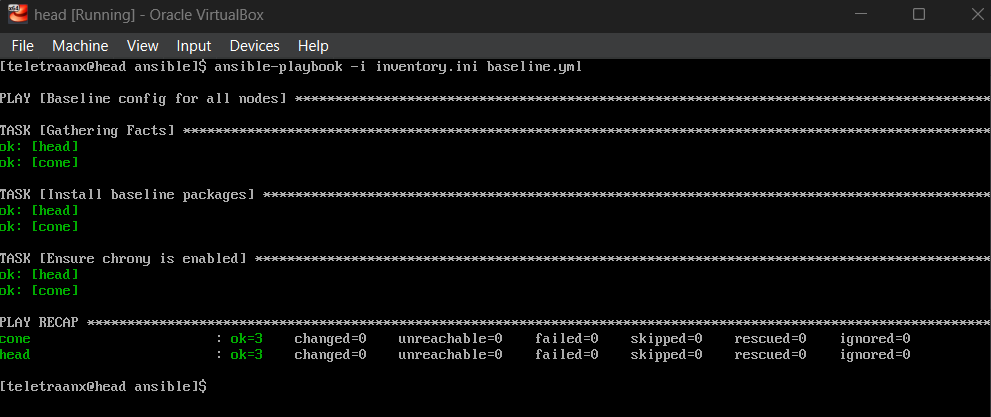
Baseline Config via Ansible
Now, instead of installing common packages manually on each node, I can define a baseline configuration and push it via `ansible-playbook`. This automation ensures both nodes have consistent tooling (Python, Chrony, etc.), and re-running the playbook will be safe.
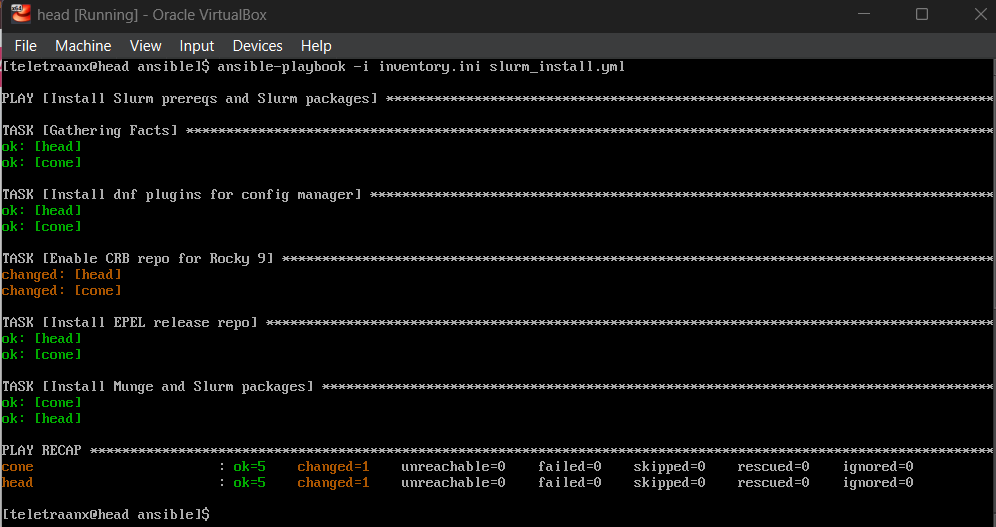
Slurm Installation and Authentication
Slurm provides scheduling: users request resources, and the scheduler decides where and when jobs run. MUNGE provides authentication between Slurm services. I used Ansible to install required packages across the cluster, then configure MUNGE so the Slurm controller and daemons can authenticate securely.
Installing Slurm and MUNGE via Ansible
Enabling CRB, EPEL, and installing: slurm, slurmctld, slurmd, munge
MUNGE Setup
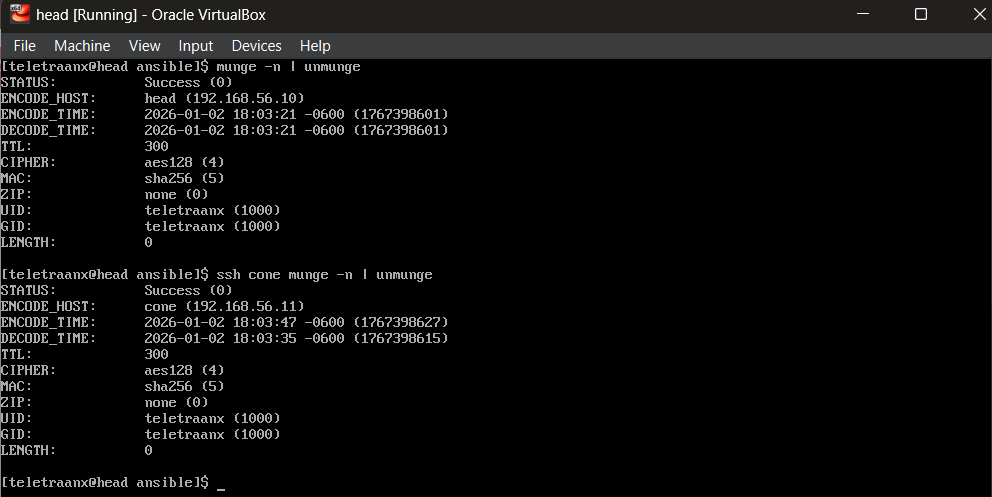
MUNGE uses a shared key (/etc/munge/munge.key) across the cluster. This key must be identical and properly permissioned on every node.
- Generate key on head
- Copy securely to compute node
- Ensure ownership and permissions
- Start MUNGE
Slurm Configuration and Scheduling
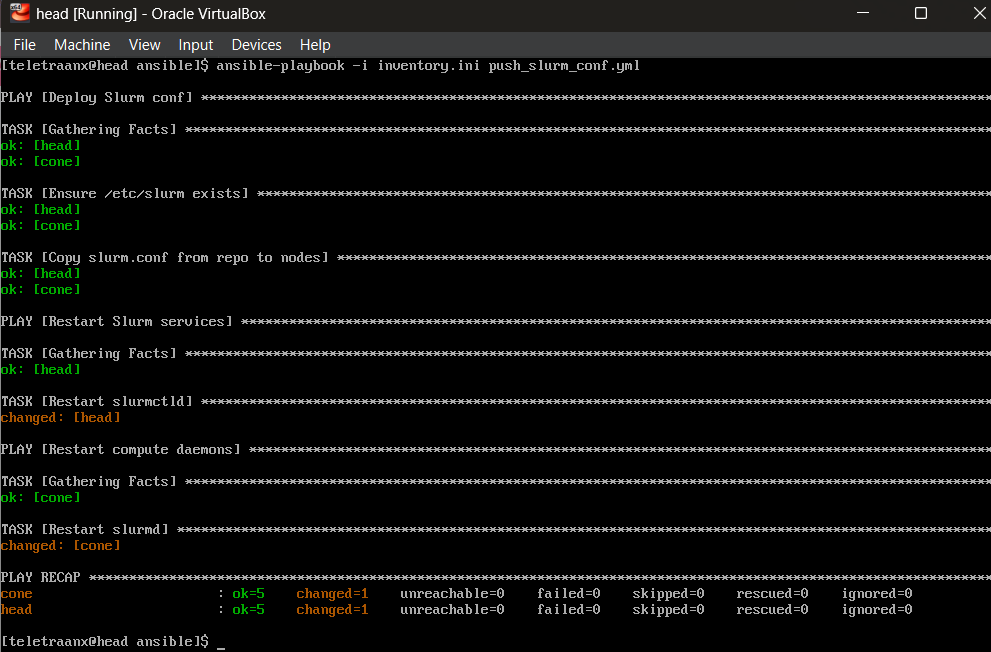
Slurm is configured via slurm.conf, which defines cluster name, controller, authentication method, nodes, and partitions. Configuration lives in source control and is deployed to nodes via Ansible (push_slurm_conf.yml), not hand-edited on each node. Once services are started, I verify that the controller sees the compute node and can schedule jobs to it.
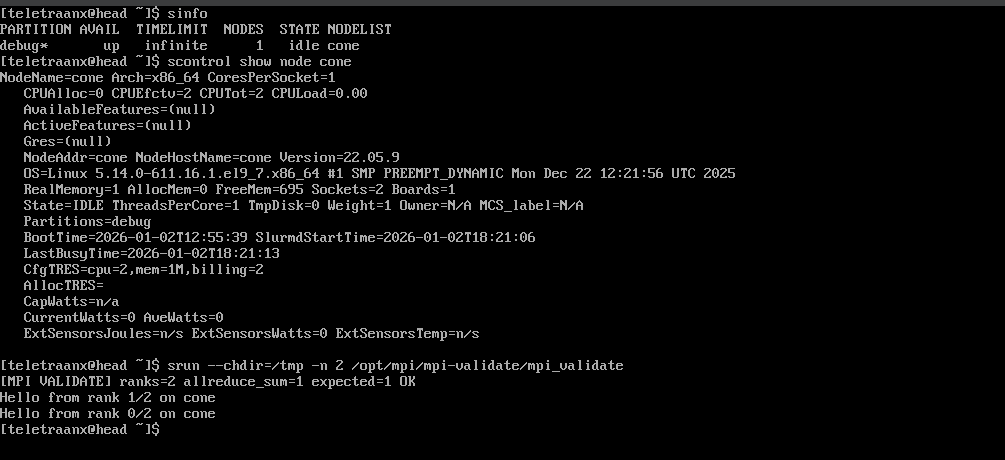
sinfo
srun hostname
Resource Scaling and Troubleshooting
I increased the compute node’s CPU allocation, updated slurm.conf, and validated that Slurm could schedule multi-task jobs. During this change, after I had stepped away from the project for the night, I encountered a downed node. I was able to diagnose the issue using logs and time sync tools and found that the problem was time drift, which caused MUNGE credentials to be rejected and Slurm to mark the node unavailable. I corrected the system time, restarted services, and revalidated scheduling.
CPU Scaling
- Increase compute node CPUs to 2 via VirtualBox
- Update slurm.conf
- Restart Slurm daemons

Troubleshooting: Time Drift
Encountering a downed node:
sudo journalctl -u slurmd -xe --no-pager | tail -n 40
timedatectl
chronyc tracking
date
Logs indicated:
Munge decode failed: expired credentialMUNGE credentials are time-sensitive. If node clocks drift far enough apart, credentials generated on one node can be rejected on another as “expired.”
Solution:
Re-sync time on both nodes:
sudo systemctl restart chronyd
sudo chronyc makestep
Restart MUNGE:
sudo systemctl restart mungeRestart Slurm daemons:
sudo systemctl restart slurmd # on compute node
sudo systemctl restart slurmctld # on head
or use ansible playbook.
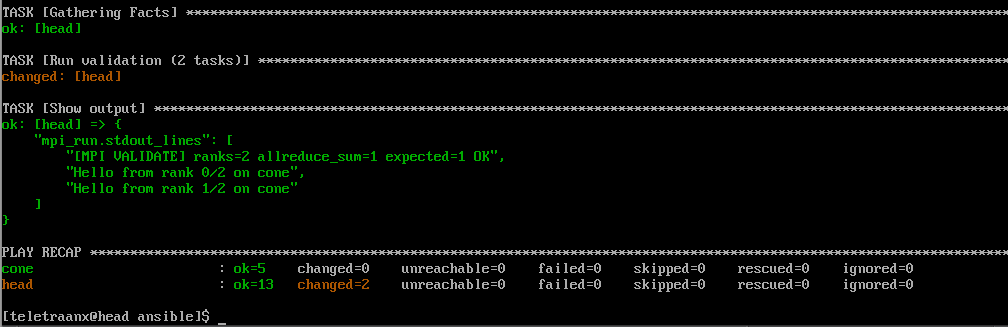
MPI Validation via Slurm
In this project, I’m using MPI as a health check. Running MPI under Slurm proves that the scheduler can allocate resources and launch a parallel workload reliably.
Automated MPI Validation Deployment via Ansible
I use ansible-playbook to install OpenMPI on all nodes, compile the validation binary on the controller, distribute it to all nodes, then run it through srun.

MPI Validation Program (C++)
- Uses MPI_Allreduce as a correctness check
- Prints rank and hostname
- Notified failure if communication breaks

Failure Injection and Recovery
I wanted to simulate a node failure by stopping the compute daemon, observing scheduler state changes and job failure behavior, then restoring services and re-running validation.
Small Simulated Node Failure
On compute node, stop slurmd:
sudo systemctl stop slurmdOn head node, observe the impact:
sinfo
scontrol show node cone
srun --chdir=/tmp -n 2 /opt/mpi/mpi-validate/mpi_validate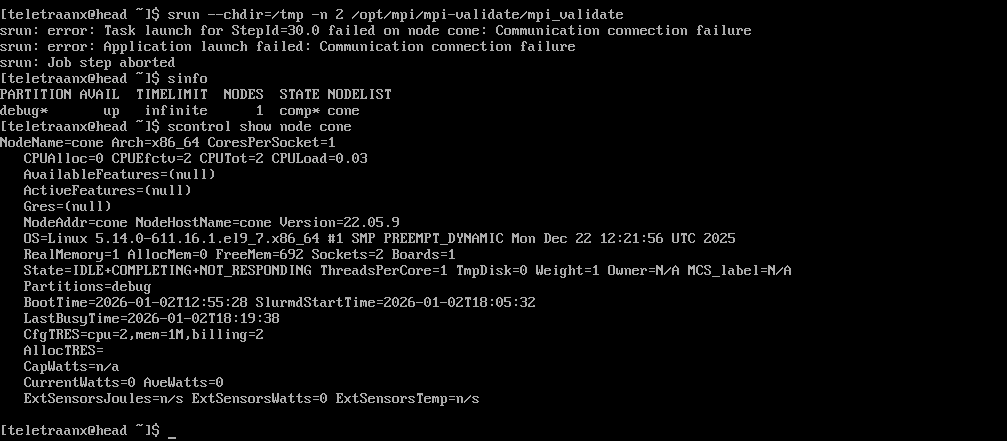
Recovery
Bring the node back up and re-validate MPI:
sudo systemctl start slurmd # on cone
sinfo # on head
scontrol show node cone

srun --chdir=/tmp -n 2 /opt/mpi/mpi-validate/mpi_validate